Lumia 950 / Windows 10
This is a sequence of steps to perform regular Windows 10 Pro image install onto your Lumia AArch64 phones (Lumia 950 and Lumia 950 XL).
TOC
— FFU: Firmware Update
— UNLOCK: Unlock Bootloader
— GPT: Allocate Partitions
— EFI: Install EFI Applications
— BCD: Edit BCD Store
— WIM: Apply Windows Image, Drivers and Packages
— WOA: Do all the steps starting from the GPT automatically!
FFU
I want to assure you that this is very hard to brake the phone. Even if you destroy the phone partition this is restorable with Windows Device Recovery Tool which is official Nokia/Microsoft tool for service centers. This tool will download a latest firmware from support servers (still operate) and flash your phone even with broken partitions (just need to do it twice). There are other ways to flash FFU, e.g. from WPInternals.
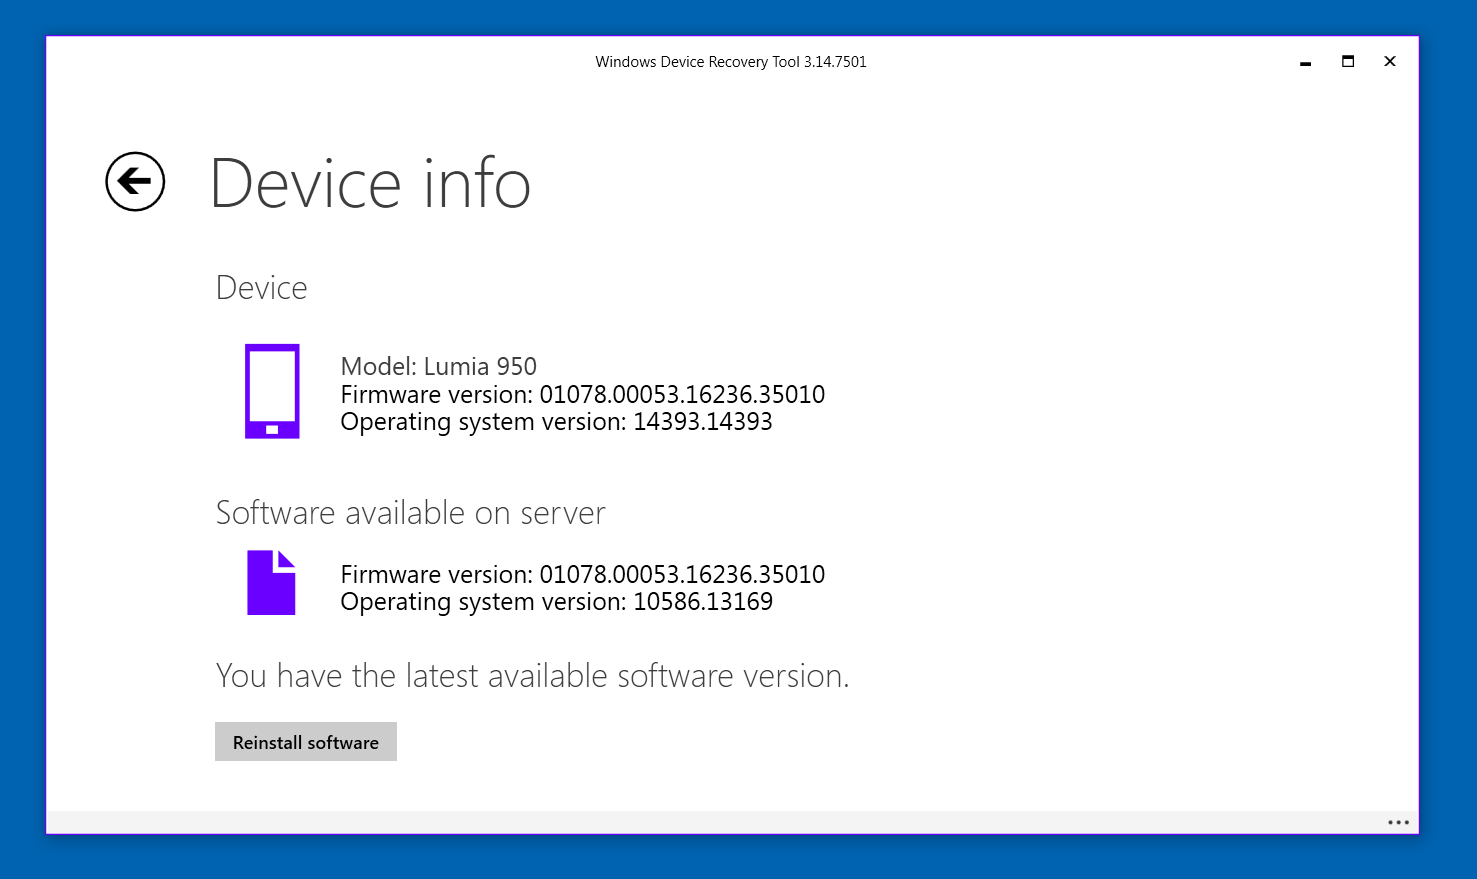
So the first step is to perform firmware update with Windows Device Recovery Tool.
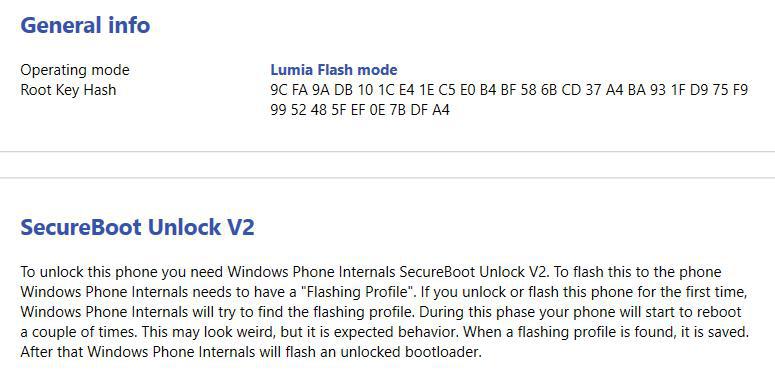
UNLOCK
We need to unlock the phone to manipulate with GPT. This is done by WPInternals tool which is well crafted .NET application that supports all Lumia phones line up to first Lumia 800. NOTE: Unlocking bootloader will block official Windows Update channel, so before gold install you need to update Windows 10 Mobile a little bit.
The phone can be in one of 4 modes:
1) Normal mode (when you pluggin the phone with default drivers in host OS);
2) Flash mode (for unlocking and locking the bootloader, needed for our experiments);
3) Mass-storage mode (for manipulating with direct access to GPT);
4) Label-mode (we don't need it).
There are only following name and root key hashes combinations (Lumia AA64 models). The code for determining the model could be found in Deployer.Lumia.NetFx namespace. This information is needed to know which drivers should be applied to Windows folder from WIM image.
 P6211 427D8FD5A7F227820D5B11BF8C6F7670C0A0622CC61BA95AAEE18F7517FC0B77 (Cityman)
 P6170 427D8FD5A7F227820D5B11BF8C6F7670C0A0622CC61BA95AAEE18F7517FC0B77 (Hapanero)
 P6218 9CFA9ADB101CE41EC5E0B4BF586BCD37A4BA931FD975F99952485FEF0E7BDFA4 (Talkman)
NOTE: Hapanero is an engineering sample with code RX-130; Lumia 950 has following codes: RM-1104, RM-1105, RM-1118 (Talkman); Lumia 950 XL: RM-1116, RM-1085 (Cityman). It's hard to buy such devices, impossible new.
So the second step is to unlock your phone with WPInternals tool. During this step WPInternals will force you to download freshly updated firmare to your disk as FFU file, so later you can WPInternals to flash too. Also this is a way how FFU files are being distributed over internet among enthusiasts.
GPT
GPT is a new MBR. First let's investigate after unlocking the original GPT layout of your Lumia:
 01 f4745655-921e-4105-a46c-f48b64821455 IS_UNLOCKED
 02 fa41d2ac-8315-44b4-bb5b-da5222f4327d DPP
 03 cfe554cf-ad7b-4a2d-9800-4dc0d9431600 MODEM_FSG
 04 d6b6d6bd-b448-4d07-acaf-56e9a22aba6e MODEM_FS1
 05 cab1b0e5-60b4-4166-a5e7-ce54cd641441 MODEM_FS2
 06 13c5f6e4-7a06-496d-9e29-0c96c941584e MODEM_FSC
 07 e8704cad-fd32-4b95-97f0-fc52d7274374 DDR
 08 4cb6d289-1b54-4f6e-8df8-bc807b3487ca SEC
 09 9c2d1a69-47f9-4e03-be40-ba47b7c67acd APDP
 10 8b134709-fb42-4cdb-ae2e-8b81e9197ad5 MSADP
 11 9338f0a5-e07e-4b6f-bd53-1ea75679c1de DPO
 12 331fc168-4ec5-4284-a8b2-e5283616d400 LogFS
 13 506241ec-4059-4221-b5f1-54480b04b1c0 SSD
 14 8f826f72-9275-4702-9f52-2609ddc3a849 BACKUP_BS_NV
 15 3e4899b8-9ae8-481c-8a60-6ff03b126922 UEFI_BS_NV
 16 88ca48cf-87e7-4dec-930d-f39cccf0f54c UEFI_RT_NV
 17 43c0ce5e-9e49-4e70-990a-2161e71a2cba LIMITS
 18 4397c2e3-7d81-43fe-9fff-2be941f67a26 SBL1
 19 273b096d-0317-46d0-8448-c1f4068f182d PMIC
 20 0c9da23d-45da-4078-9226-e1470028b736 DBI
 21 be1cd953-b576-44fc-8426-7fe0cb2c5d74 UEFI
 22 43a1edf0-fd57-42dc-b2cb-6befd9d98999 RPM
 23 13d863bd-a489-469d-be04-d81a55ab99b9 TZ
 24 d141f700-dce5-4834-a7f8-e3994575894f HYP
 25 20b5a3a1-cf6d-4d07-8d32-c96cc929ab5c WINSECAPP
 26 503ffa03-e94b-4925-9e60-31acd8bd81ee TZAPPS
 27 9e93b382-e4e9-4ef9-b878-2f56950c4a59 BACKUP_SBL1
 28 881f6d52-efd8-43f3-a08f-1c42cff21214 BACKUP_PMIC
 29 59d8536b-2e1a-4165-a1fb-83c8b8e15552 BACKUP_DBI
 30 31d30a94-0894-4252-899e-62bf3d512f42 BACKUP_UEFI
 31 008a69a2-a3ae-41ec-8ed3-c733cf999b14 BACKUP_RPM
 32 1459e13c-9510-4892-893c-8a27dce7f1cf BACKUP_TZ
 33 217a15db-ef75-4710-ae12-efc2edb57a51 BACKUP_HYP
 34 e38cb75a-a418-4e8f-9d8f-78cfff726930 BACKUP_WINSECAPP
 35 ff5ac154-cf54-4787-82e4-1be8300e2b0a BACKUP_TZAPPS
 36 f27ffcb1-301c-494d-8774-20eb98116f2c PLAT
 37 8183040a-8b44-4592-92f7-c6d9ee0560f7 EFIESP
 38 27a47557-8243-4c8e-9d30-846844c29c52 MMOS
 39 a76b8ce2-0187-4c13-8fca-8651c9b0620a MainOS
 40 29733395-09dc-4270-b97a-22076f996643 Data
You can do everything from Disk Management console however for the sake of simplicity here we will use only command line built-in tools from Windows. For Windows 10 setup we will need 3 partitions:
 41 cdb97453-1076-4b98-a77d-2c52dce36333 SYSTEM
 42 f52d2070-ff31-421a-bb3e-a06c0bd16b08 MSR
 43 96c66c31-d961-4a28-9e6c-a2fcc63a11f1 Windows
This can be done either in Disk Management console or by diskpart. It's always better to use official Windows tools.
 C:\> diskpart

 list disk
 select disk
 create partition efi size=400
 format fs=fat32 quick label=WOABOOT
 assign letter I:
 create partition msr size=128
 format fs=fat32 quick lobel=Reserved
 create partition primary
 format fs=ntfs quick label=Windows
 assign letter K:
So the second step is to allocate three partitions for Windows 10 Pro setup.
EFI
EFI is a a new BIOS. Three years ago I made two notes about EFI: LUA.EFI and State of EFI in 2016. I love hacking EFI. So we basically need to setup three EFI applications and one UEFI.elf: 1) BootShim.efi for booting Windows 10 Pro (); 2) developermenu.efi for developer menu inside NTOSLDR with diagnostic routines and Mass-storage mode enabler; 3) WinLoad.efi for bootin Windows 10 Mobile; 4) UEFI.elf. These file should be placed at following locations:
 EFIESP:\EFI\boot\BootShim.efi
 Windows:\Windows\System32\BOOT\developermenu.efi
 MainOS:\windows\system32\boot\WinLoad.efi
 EFIESP:\UEFI.elf
You may add other EFI application on your AA64 system. Let's report all useful EFI projects for ARM64!
BCD
BCD is like GRUB or uboot but for Windows. The normal sequence procedure swipe out all BCD entries and recreate everything from scratch for GUID retrivals.
 bcdedit /store BCD /create /application OSLOADER /d "Lumia 950"
 bcdedit /store BCD /create /application OSLOADER /d "Windows 10"
 bcdedit /store BCD /create /application BOOTAPP  /d "Developer Menu"
The BCD entry for booting Windows 10 Mobile from MainOS partition should be like that:
 bcdedit /store BCD /set %win% description "Lumia 950"
 bcdedit /store BCD /set %ent% systemroot \windows
 bcdedit /store BCD /set %ent% path \windows\system32\boot\winload.efi
 bcdedit /store BCD /set %ent% device partition=F:
 bcdedit /store BCD /set %ent% osdevice partition=F:
 bcdedit /store BCD /set %ent% locale en-US
 bcdedit /store BCD /deletevalue %ent% bootstatuspolicy
 bcdedit /store BCD /deletevalue %ent% bootmenupolicy
The BCD entry for booting Windows 10 Pro from new partition "Windows 10" should be like that:
 bcdedit /store BCD /set %win% description "Windows 10"
 bcdedit /store BCD /set %win% device partition=G:
 bcdedit /store BCD /set %win% path \EFI\boot\BootShim.efi
 bcdedit /store BCD /set %dev% device partition=G:
 bcdedit /store BCD /set %dev% path \Windows\System32\BOOT\developermenu.efi
 bcdedit /store BCD /set %dev% description "Developer Menu"
For each partition {x} perform nessesary flags and after that list all your partitions you want to include into NTOSLDR boot menu. It may include all EFI modules you may found running or developed by yourself!
 bcdedit /store BCD /set {x} testsigning yes
 bcdedit /store BCD /set {x} nointegritychecks yes
 bcdedit /store BCD /displayorder %ent% %win% %dev%
WIM
DISM is the tool for managing WIM images, apply them to partitions, patch drivers and service packages. WIM is new ISO-9660 from Microsoft created especially for Windows provisioning. E: drive here contains regular ISO image of Windows 10 for ARM64.
 dism /get-WimInfo /wimfile:e:\sources\install.wim
 dism /Apply-Image /ImageFile:e:\sources\install.wim /Index:1 /ApplyDir:K:\
 dism /Image:k:\ /Add-Driver /Driver:"MSM-8992" /Recurse
 dism /Image:k:\ /Add-Driver /Driver:"Device Specifics\MMO" /Recurse
 dism /Image:k:\ /Add-Driver /Driver:"Device Specifics\Talkmam\Common" /Recurse
 dism /Image:k:\ /Add-Driver /Driver:"Device Specifics\Talkmam\SingleSim" /Recurse
Also you need to copy root of DPP partition to 'Windows:\DPP' folder location. This is final step, now you need to temporarily disable dual boot:
bcdedit /store BCD /set %ent% path dummy
After then you reboot the phone, chose Windows 10 in NTOSLDR and proceed the Windows Setup. When is's done reboot in the Developers Menu, chose Mass-storage mode and restore dual boot with:
bcdedit /store BCD /set %ent% path \windows\system32\boot\winload.efi
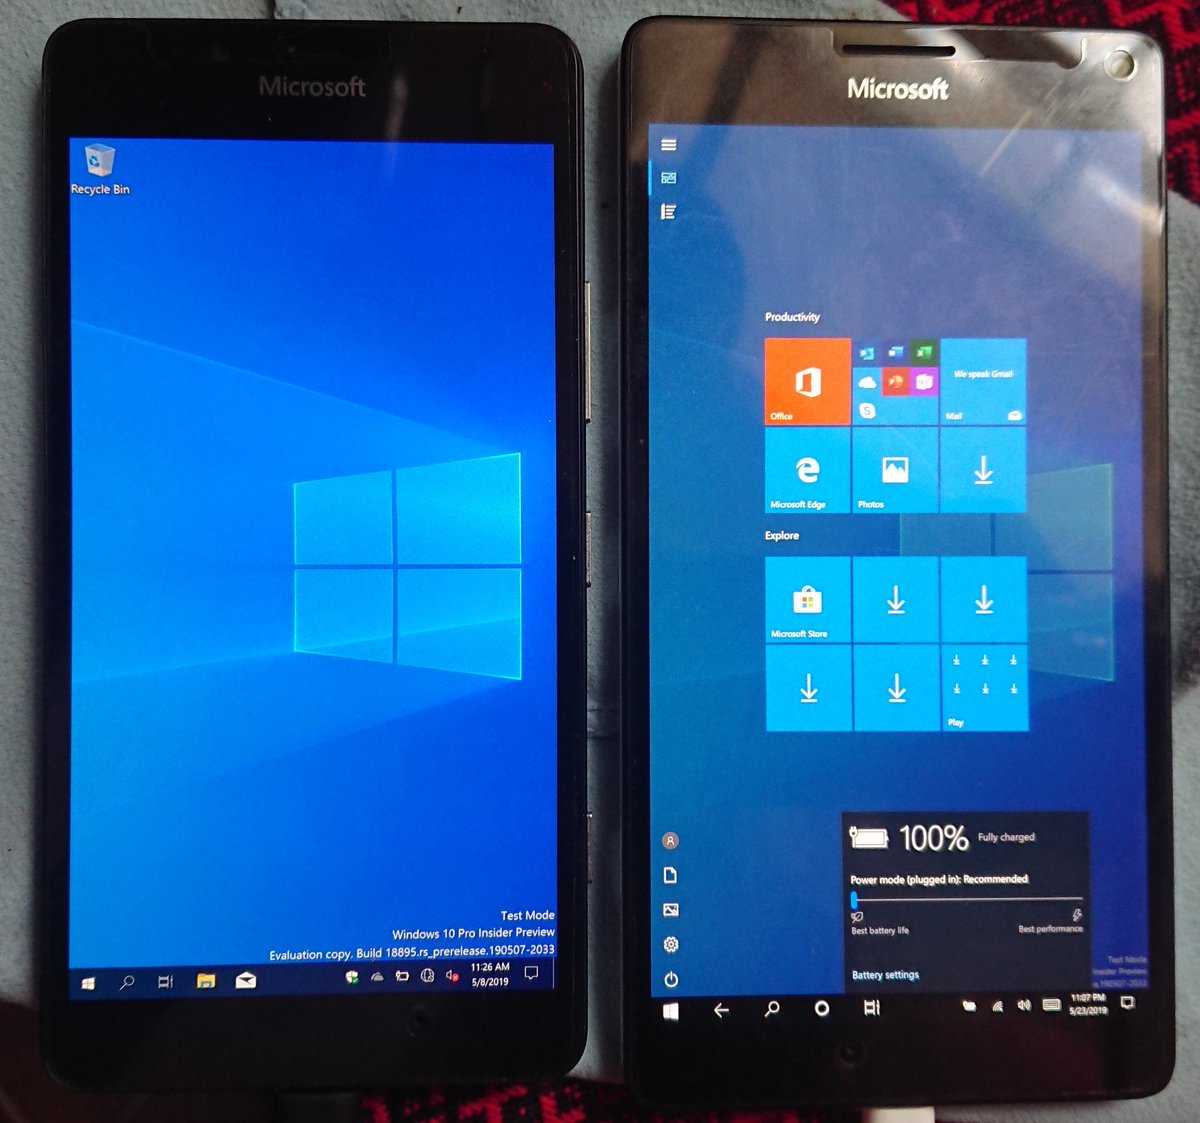
Now enjoy your Windows 10 Pro with dual boot in Lumia 950.
I also made video cut of Windows Setup experience as instagram story for those who want to see all the glitches and unveil the real step by step setup.
WOA
WOA brand means Windows on ARM64. Everything starting from GPT step could be done automatically by WOA Deployer tool written by José Manuel Nieto Sánchez who helped to make this post clean, who enlightened essential parts and clarified the nessesary sequences to complete the setup. This manual is slightly based on his pre-WOA document, also at the end here is historical video of first runs. Find the latests release builds or build WOA Deployer yourself (it's under MIT license):
— WOA-Project/WOA-Deployer-Lumia — 2.5.5
Fix typo, introduce changes or put like for this page at:
Lumia WoA
Discuss: https://github.com/5ht/tonpa.guru/issues/10